Have you ever checked the salt level in the brine tank expecting to have to fill it, only to see that it’s still sitting in the same spot it was at last month when you last filled it?
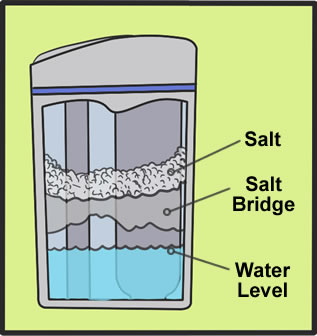
The most common reason why your water softener will stop using salt is because of a salt bridge that has formed at the bottom of the brine tank. A salt bridge is caused when pieces of salt are bonded together to create a hard crusty surface on the top of the water in the brine tank. The hard crusty surface will block and prevent new salt from falling.
Luckily, if you do have a salt bridge causing the problem, it is something fairly easy that you can fix on your own without the help of an expert.
How To Identify If You Have a Salt Bridge
The first sign to identify if you have a salt bridge is if you start to notice that the water coming out of your faucets are hard. The reason for this is because the salt bridge will be preventing new salt from falling to the bottom, so the water is not getting softened before it comes through your taps.
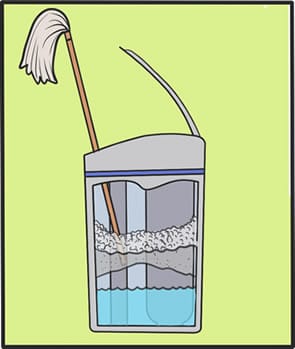
To check for a salt bridge, try this; take a long wooden stick, such as a broom or a mop handle and push it down into the brine tank and through the salt. If you are not able to push the stick all the way down to the bottom because it’s hitting on something hard, then you know that you have a salt bridge.
How Do You Stop The Salt Bridge On a Water Softener?
Follow the steps below to get rid of a salt bridge:
- Set the water softener in the bypass position.
- Remove all of the loose salt from the top of the pile and place it in a large bucket. To scope it, you can use a plastic cup, small bowl, or garden shovel.
- Once you’ve hit the top of the salt bridge, take a rubber hammer or the end of a wooden broom handle and carefully break away more of the salt. Place those now loose pieces in the bucket with the other salt you removed.
- After you’ve broken through the bridge, you should now see water at the bottom of the brine tank. Use a shop vac or plastic cups to remove as much water as you can.
- With the water removed, and the hard crusty salt chunks remaining, take a bucket of hot water and dump it into the brine tank until all of the salt is submerged.
- Remove the cap from the brine well and again dump in some hot water.
- Let the hot water sit and absorb the salt for about four to six hours.
- After the salt has had time to absorb the salt, switch the bypass back over to the service position and manually set the water softener to regenerate.
- Next, wait 24 hours and check to see if there are any clumps of salt at the bottom of the tank by poking around with a broom handle. You might have to repeat this step for the next few days until that salt is gone. Once the salt is fully absorbed, you can now bump the salt you removed back into the brine tank, no more than 2/3 full.
Preventative Actions:
To avoid future salt bridges from forming you can try the following:
- Do not overfill the brine tank with salt. Instead, try not to fill past the 2/3 mark.
- Use a good quality salt.
- If your water softener is in a basement with high humidity, you could try reducing the humidity in the room.
- Every few weeks, take a wooden broom handle and shove it down into the brine tank through the salt to make sure there is not another salt bridge forming.
Water Softener Not Using Salt, No Salt Bridge
 If you checked and found out that you don’t have a salt bridge causing the problem, it could be possible that there is a clog inside of the nozzle venturi. The nozzle venturi is the part that pulls the brine solution out of the brine tank, and if this part stops working correctly the brine solution will not be able to get pulled out, and therefore it’ll not be using any salt.
There are different styles of water softeners that have a different nozzle venturi set up. Below I’ll go over the two most common styles and walk you through on how to check those.
Before you check the nozzle venturi, you should put the water softener into the bypass position.
Style 1
- Next, locate the nozzle and venturi housing at the top of the unit and unscrew the cap. Be very careful with the O-ring seal and try not to damage this part.
- Now, lift out the screen support and screen from inside. Under those, you’ll then remove the nozzle and venturi.
- Remove the gasket, small screen, and the flow plugs as well and wash them in clean, warm water.
- Take those parts and wash them in clean, warm water. Use a toothpick to pick away any debris.
Once you’ve finish cleaning everything, you can now begin to reassemble everything, by putting them back in the exact order in which they were removed. It is important that you reinstall the flow plugs with the numbers printed on them facing up.
Before putting the O-ring back on, take some petroleum jelly and lightly spread it around the ring. Screw the cap back into place, making sure to not over-tighten it. Hand tight is fine. Don’t forget to put the water softener back into service when you are finished.
Style 2
If your water softener doesn’t have a nozzle and venturi housing as shown above, then you might have a clack valve with the nozzle venturi located in there.
To check and clean the nozzle venturi in this set up is just as easy. But again before you start, ensure that your water softener is in the bypass position.
- Local the clack valve located at the top of the unit, and unscrew the cap.
- Using a pair of needle nose pliers, slowly and very carefully pull the nozzle venturi out.
- Once out, take a look at on either end of the nozzle venturi and make sure no obstructions are blocking the openings. Clean them out if necessary.
- When you are ready, the nozzle venturi will slide back into place and click in with a little push down from your finger.
- Put the cap back on, but not too tight. Hand tight is fine.
If that doesn’t solve your problem, the other reason why the salt might not be getting used could be because the water softener has made it to the end, and needs to be replaced. Water softeners are expected to last anywhere from 10 years to 20 years, depending on the type you buy. But on average if you can get 12 years out of your water softener, then you’ve done pretty well.
How Often Do I Need To Put Salt in My Water Softener?
Experts say that you should be checking on your salt level at least once every month to ensure that it still has salt in the tank. Some smaller tanks may require more frequent checks during the month.
When you go to fill the tank with salt, you do not want to overfill it. Ideally, you should keep the level of salt around the halfway mark, and never any higher than 2/3 full.
What’s The Best Water Softener Salt?
Experts will tell you that the best salt to use in your water softener is a pellet type. The reason for this is because it will break down better and it won’t cause many problems with clogging.
Of course, you should always check with the water softener manufacture to see which type of salt they recommend with your make and model.
Will Running Water Softener Without Salt Ruin It?
Running a water softener without any salt will not ruin it. The water softener will not know that there is no salt in the tank and therefore it will go through the regular regeneration process as if there was salt.
The only problem is that the water softener will continue to run and regenerate hard water, which if left long enough could begin to gum up your tank and lines with a limescale build up.