Concrete basement floors are prone to cracking; in fact, concrete floors will eventually crack; it’s only a matter of when. If you take into account things like earthquakes, flooding, the shifting ground, tree roots, to name a few, then the concrete cracking will happen sooner for some homeowners.
The most common cause for foundation floors to crack is due to concrete shrinkage. Concrete is made up of water, aggregate (rock, sand, or gravel) and cement. As concrete dries, the water evaporates, causing the concrete to shrink a little and crack. These types of cracks are normal and shouldn’t be much of a concern.
Another common cause for cracks in the foundation floor is due to the presence of water in the soil under the floor. The access water will cause the soil to heave and push upwards, cracking the concrete floor slab. This type of crack is, however, a cause for concern and should be looked at by a professional.
Unlike the foundation walls in your basement, the basement floor does not bear the weight of the home, so therefore cracks in the floor shouldn’t have any effect on your home’s structural integrity. But with that said, a floor crack could be the first sign of a much larger problem to come.
Is it Normal For Concrete Floors to Crack?
Cracking is a natural occurrence in concrete. When concretes first poured, it is in a liquid state. Over a few days, it will begin to harden into a solid concrete slab, slowly shrinking as it does. As the concrete shrinks, it will slowly begin to form hairline cracks. Hairline cracks are normal and do not affect the integrity of the concrete.
Often contractors might add a little too much water to the mix to make it easier for them to apply. Unfortunately, this also makes the concrete more prone to cracking, and not uncommon for it to crack even one year after the initial construction.
Changing temperatures could also play a toll on concrete and cause thin cracks to appear over time. The best thing to do is to keep an eye on the cracks and see if they are getting worse.
What Causes Basement Concrete Floors to Cracks?
Concrete goes through a lot; cracking is inevitable, no matter how hard the best contractor tries, concrete will eventually crack.
Concrete cracks for several different reasons, the most common reasons for a basement floor to crack are; shrinkage, heaving and settling, premature drying, and expansion.
#1. Shrinkage Cracks
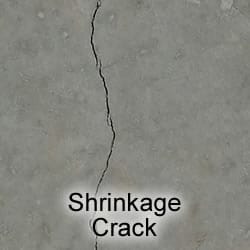
Concrete is primarily made up of cement (often in powder form), an aggregate like rock or gravel, and water. The moisture is lost as the concrete hardens, but since the water is what enables the concrete to take up more space, the concrete will shrink.
While shrinking, more and more stress is put on the concrete, especially when hardening at corners or around cylindrical objects and circular spaces. Eventually, the concrete cracks to relieve all the tension put on by shrinking. The cracks caused by shrinking are usually only hairline cracks (less than 1/16″ or as wide as 3/32″), but these hairline cracks typically extend far beyond the surface.
Shrinkage is a common problem when installing concrete during the hot summers, where the moisture is lost quickly, and when concretes mixed with too much water. When a concrete mix contains an excessive amount of water, the concrete becomes a lot smaller once it hardens after all that waters lost through evaporation.
Cracks caused by shrinkage are generally under one-eighth of an inch and typically do not pose a threat to the homes’ structural integrity. However, these types of cracks should still be repaired and sealed to prevent water and small insects from seeping in.
#2. Heaving and Settling Cracks
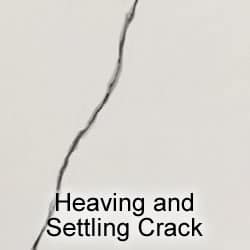 Heaving occurs when the soil beneath the concrete floor expands and pushes upward. After periods of heavy rainfall or snowfall, the soil will absorb the groundwater and can heave, or lift, the concrete floor by as much as a few inches. When the water in the ground dries up, the soil will settle again. If the concrete isn’t able to move up and down with the soil as it heaves and settles, the concrete will crack.
Tree roots are another common cause for heaving, often seen in sidewalks and driveways. As tree roots grow underneath the surface, they could cause upward pressure against the concrete and cause it to crack. Conversely, if a tree is removed, taking the roots with it, there will be a space underneath the concrete that will cause it to crack due to the uneven ground underneath it, not supporting its weight properly. This cracking due to space in the soil also happens when a tree decomposes.
Aside from the c visible cracks, if your home is settling unevenly you might also notice the following issues around the house:
- Gaps between the floor and walls.
- Gaps between the ceiling and walls.
- Gaps between two walls like they are moving apart from each other.
- Cracks in the corners of the walls.
Cracks caused by heaving is a sign of a more serious problem that should be taken care of by a professional foundation contractor.
In some cases, the entire basement concrete floor will need removed and re-poured. If moisture is the problem, an interior drain beneath the floor might be needed to collect future groundwater. This type of thing could end up costing the homeowner ten of thousands of dollars.
Keep in mind, not all heaving problems will require a complete replacement of the basement floor, but this is something that a professional should evaluate and determine for you. Call at least three different reputable foundation contractors in your area to get their opinion and quote.
#3. Premature Drying Cracks
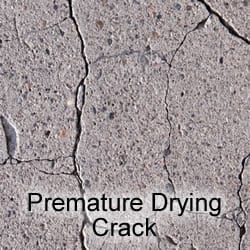 There are two types of cracks that are brought on by premature drying, Crazing cracks, and Crusting cracks.
Crazing cracks are thin hairline cracks that resemble a spider web or a shattered piece of glass. These types of cracks are brought on when the top layer of the concrete slabs loses moisture too quickly. Although not pleasant to look at, they do not pose any structural concerns for the home.
Crusting cracks typically happen when one-half of the concrete slabs dry quicker than the other, causing the dryer half to become crusty. When texture or patterns are added to the concrete the crusty surface near the stamped joints could begin to crack. Again, this is not visually pleasing to look at, it too does not pose structural concerns.
#4. Expansion Cracks
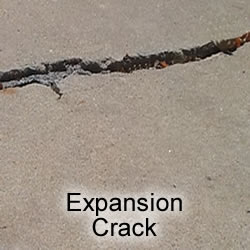 Expansion cracks are not typically a problem you might have with your basement floor but it could be possible.
In hot weather, concrete expands. Expansion usually happens due to a chemical reaction between the cement and aggregate mixture with the water in the concrete mix, catalyzed by the high temperatures that the concretes subjected to.
As the concrete expands, it might encounter walls or other hard surfaces. Since concrete can’t bend or flex, it has no choice but to crack. Typically, expansion control joints are grooved into the concrete so that if the concrete needs to crack, it cracks at these joints instead of at random places on the surface. Picture a side-walk with the grooves notched out.
How Do I Fix a Crack in My Concrete Basement Floor?
Most cracks are not serious and can be sealed back up by the handy homeowner fairly easy. It is a good idea to seal any cracks that are at least 1/8 inch or wider to keep insects, moisture, and soil-borne gases from seeping up through the basement floor and into your home.
Tools and materials:
- Masonry wire brush, or Wire wheel brush drill attachment
- Shop Vacuum, or Air compressor
- Safety glasses
- Screwdriver
- Respirator with full face mask
- Concrete chisel
- Backed Rod
- Hammer & chisel, or Crack chasing blade
- Masonry trowel
- Epoxy crack formula (such as; Rust-Oleum Concrete Patch)
Hairline Crack Repair

For thin cracks in the foundation, you can try using a “crack chasing” technique. Crack chasing refers to the process of cutting into a crack to make it wider into like into a v-shape to give yourself more of a surface area, so your epoxy has something to stick too.
Step 1 – Crack Chasing
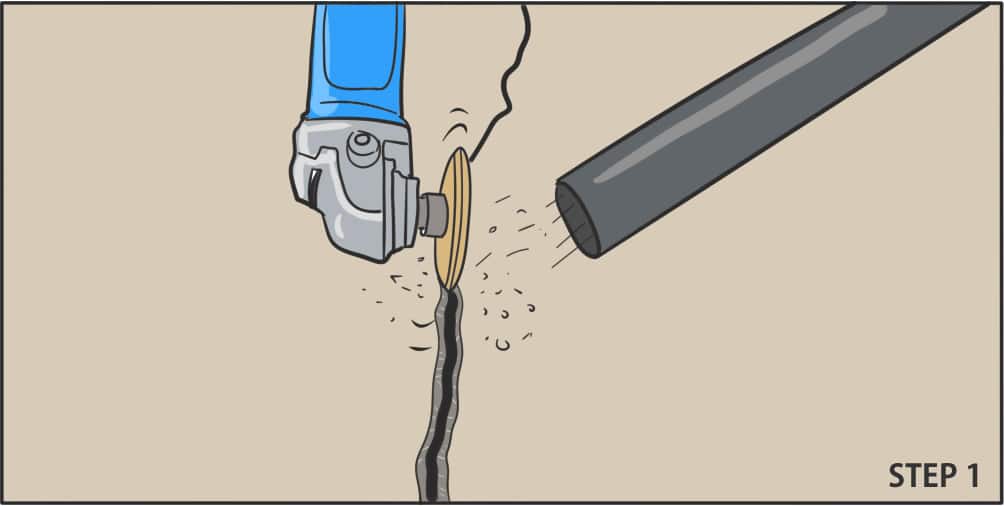
There are two ways that you can do this. The first way is much more time consuming, but it involves using a hammer and chisel to go along the crack and create the v-shape into the concrete. For smaller cracks, this might not be a bid deal, but it will still be time-consuming.
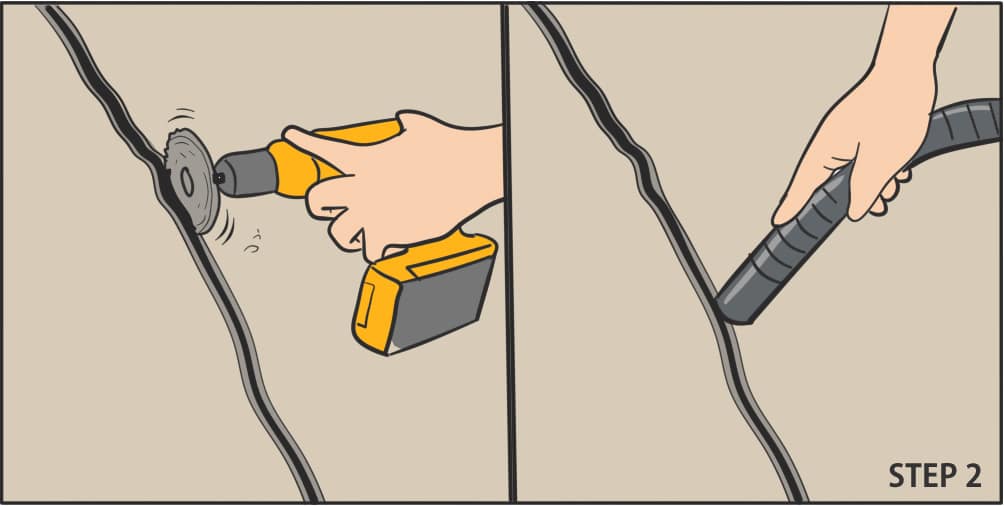
The second way is to use an angle grinder with a crack chaser blade attachment. For larger cracks this method might be more desirable since it will take no time at all to prepare the crack. The crack chaser blade is generally only available online that I have seen. Amazon carries them for around $55 (click here for the current price).
If you do end up using a crack chaser blade, keep in mind that they create a lot of dust. Make sure to wear eye protection, as well as a respirator with full face mask. To help lower the amount of dust, you can try holding a shop vac next to the blade while you cut.
Step 2 – Clean The Crack Out
Using a wire brush or wire brush attachment on your drill, scrub in and all around the crack to help loosen and chip away dust and debris. Next, use a shop vacuum or an air compressor to clean out the crack of any dirt, dust, and debris.
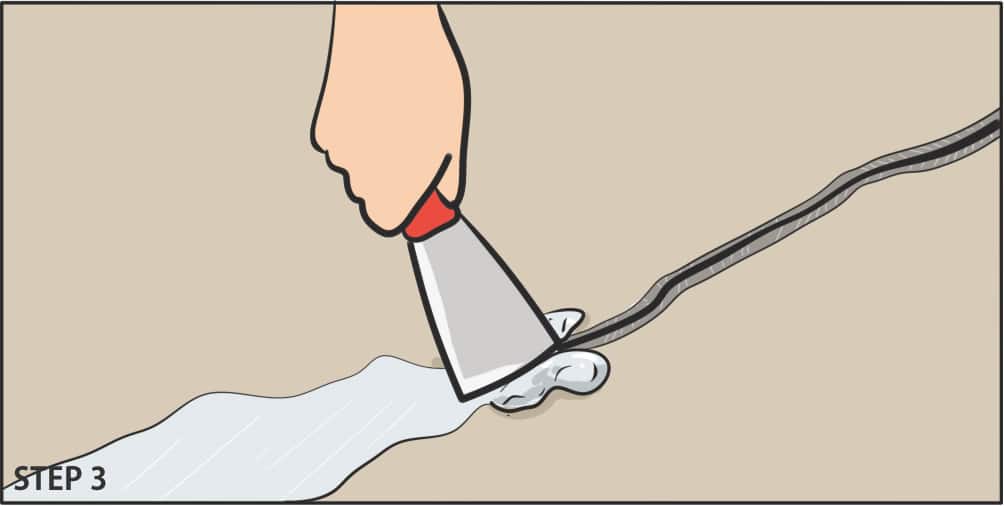
Step 3 – Fill The Crack
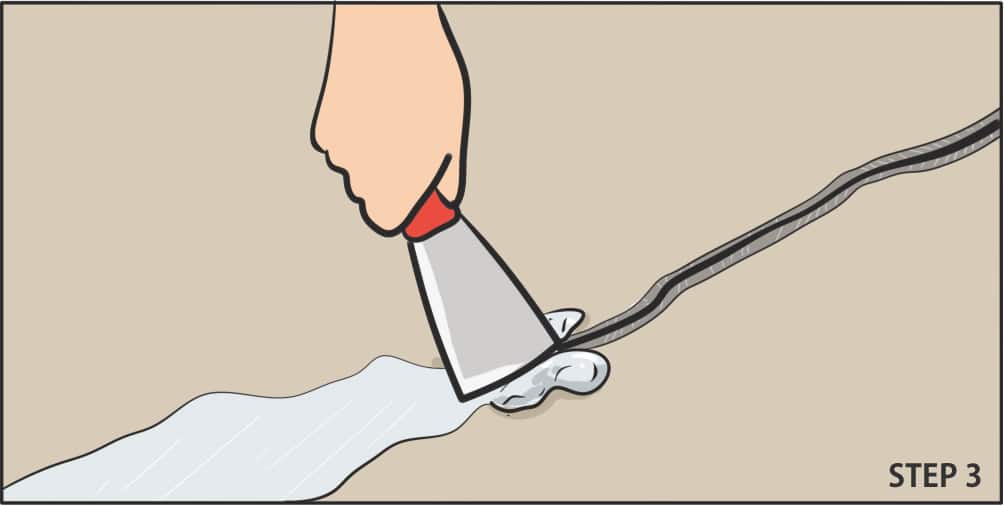
Use a concrete epoxy to reseal the crack. A product like Rust-Oleum Concrete Patch is easy to use and works great at patching up cracks. Once the epoxy is mixed, use a masonry trowel to push the formula deep into the crack and smoothen it out as you go along the crack.
Allow 8 to 12 hours for the patch to cure before painting.
For more information on Rust-Oleum Concrete Patch, including customer reviews, and current pricing, visit the product on Amazon here.
If necessary, use a diamond cup grinding wheel attachment on your drill or angle grinder to smoothen and flatten the repair surface.
Wider Crack Repair

Step 1 – Clean and Remove Debris

Start by sticking a screwdriver into the crack to loosening any debris. Start on one of the ends of the crack and work your way backward. If you have a wire brush or a wire brush attachment for your drill, go along the crack and help loosen the dirt and to get better adhesion of the filler later. Last, use a shop vacuum or air compressor to clean out any debris and dust in the crack.
Step 2 – Wedge Foam in Crack
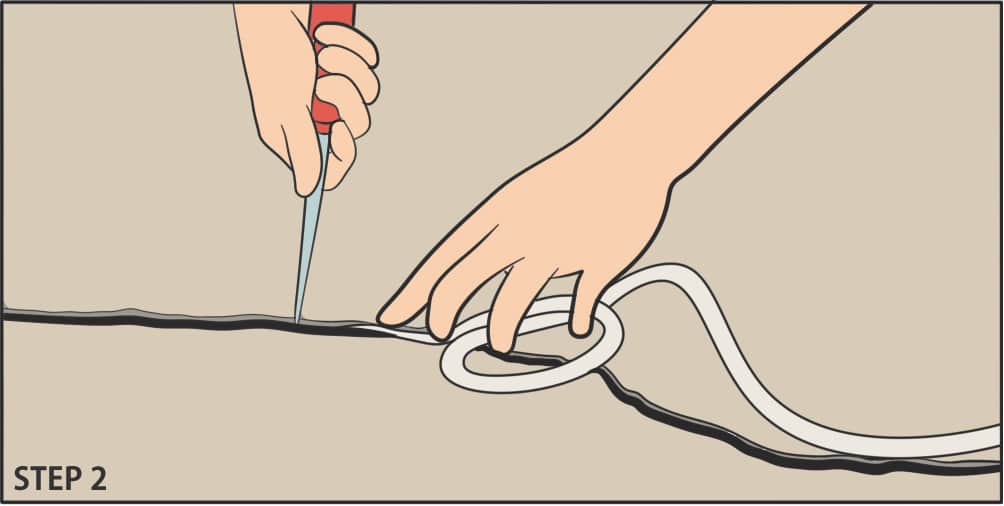
Using a product called Backer Rod, we are going to wedge it down into the crack to prevent our filler from seeping down too deep and wasting more filler then we need to. Backer Rod is a cylindrical foam that is used to fill cracks and gaps, such as foundation cracks. Backer Rod comes in many different diameters, so depending on how thick your crack is, it will depend on how wide you need.
Take a screwdriver and wedge the Backer Rod down into the crack at least 1/2 inches below the surface.
Step 3 – Fill The Crack
Next, using a concrete patch epoxy, we can now begin to fill the crack. You can pick up something from your local hardware store, or Amazon like the Rust-Oleum Concrete Patch for about $35, (Click here for the current price).
Follow the instructions to mix up the formula. Once mixed, use a masonry trowel to scoop up and wedge the formula down into the crack. Scrap the top of the crack to make it smooth. Allow 8 to 12 hours for the patch to cure before painting it.
If necessary, use a diamond cup grinding wheel attachment on your drill or angle grinder to smoothen and flatten the repair surface.
Are Foundation Cracks Serious?
Just like floor cracks, some foundation cracks are serious, while others are completely normal and won’t affect the structure of the home. Knowing what to look for is important.
The most serious type of foundation crack that you need to be concerned about is any cracks that run horizontal with the foundation or any cracks that are wider than 1/4 inch. These cracks are normally the result of soil movement, which can occur if there is soil pressure or hydrostatic pressure.
If you notice any of these types of cracks, it is important to get them repaired as soon as possible because they can cause some serious damage to your home’s foundation and the integrity of the overall structure.
Any time you see cracks in the foundation, you should never ignore them. Big or small, as the homeowner, you must make sure they don’t get any worse. For more information on foundation cracks, visit the article we wrote here.
Could Radon Gas Seep Through Floor Cracks?
Most basement floor cracks do not pose a risk of radon gas; however, if you live in an area that is known to have a radon gas problem, then chances are the gas could seep through your cracks and into the home. To find out if you live in a radon gas area, you could visit the US EPA (Environmental Protection Agency) website.
Radon detectors can be purchased and set up in your home to monitor for the gas and alert you if there is a dangerous level of radon present. A good reliable radon detector will cost you under $200. My father-in-law lives in an area where radon is a problem, and he uses Corentium Home Radon Detector.
For more information on the Corentium Home Radon Detector, including customer reviews, and current pricing, visit the product on Amazon here.
If your radon detector does find a dangerous level of the gas in your home, a professional licensed radon-mitigation contractor should be called to perform a more extensive test, and take the proper steps in sealing all cracks. A radon-reduction system may be necessary as a way to ventilate the gas away from the basement.